Table of Contents
Overviews
Overviews come in many variations and are one of the most useful tools for an Incursion pilot. This guide is aimed at helping you understand your overview and teaches you how to build one.
Overview and Tabs
The main section of your overview is by default on the right hand side of the screen.
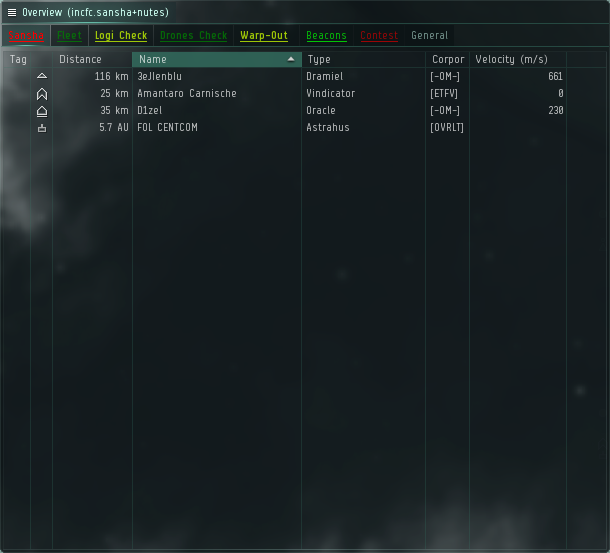
Your overview has tabs at the top, Each tab at the top of your overivew is setup with a different preset and ship bracket. The overview itself has several columns - each column can be sorted by ascending or descending. On this example (from left to right) the columns are:
- Tag - shows numbers 1-9, letters A-I, X,Y,Z and tag Js.
- Icon - Different icons symbolise the different ships and there classes.
- Distance - The distance of the targets from your ship.
- Name - Targets ship name (for rats - it will be the name of the type of rats).
- Type - Targets type (for rats - it will be the same as the ship name)
- Corporation - The corporation ticker of the target.
- Velocity - The velocity of the target.
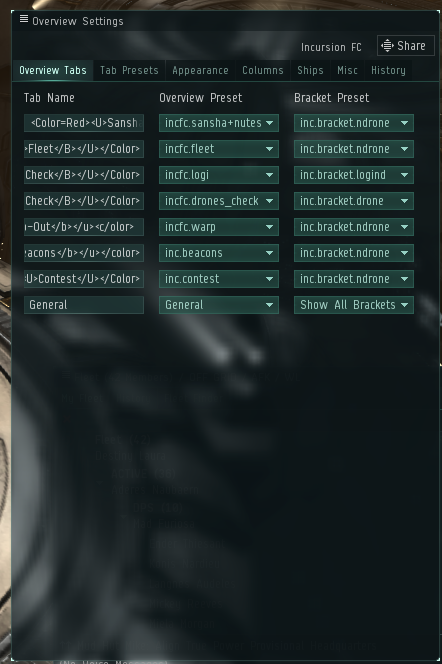
In the example overview there are eight tabs:
- Sansha + Neuts - This tab shows Sansha rats, and neutral ships. This way we can see only rats to kill and any fleet members who disconnect.
- Fleet - This tab shows all ships in the fleet.
- Logi Check - This tab shows logistics Cruisers, this is so we can check to see what logi are present
- Drone Check - This tab shows fleet ships and drones, it also shows drones in space. This is useful for FCs and drone bunnies.
- Warp Out - This tab is used as reference point for safe celestial to warp to if you are going to die.
- Beacons - This tab shows warp to beacons.
- Contest - This tab is the same as Sansha + Neuts but does not show neutral ships this is for contests.
- General tab.

Ship Brackets
Ship Brackets in space are the icons that float in space. These are useful for seeing where things are in three dimensional space.
Brackets you should include:
- Sansha
- Ships
- Stargates
- Stations
- Acceleration Gates
- Containiers
Overview Requirements
- Tags - This column is important as the tags will be used to tell you what order to kill things in.
- Velocity - Important for Vindicators to know what to shoot, and for snipers to know what they can track.
- Distance - Helps you know if the target is in optimal and what ammo to use.
- Sansha Tab - A tab that shows Sansha and neutral ships (helps you with disconnection)
- Sansha Contest Tab - Shows Sansha rats only, this is good for contest situations as it stops your competing fleet from showing up on your overview.
- Warp-out Tab - Important if you are going to die, and are scrammed use this tab to help you get your pod off grid.
Recommended Overviews
Most of our fleet MOTDs now have an overview linked in them. Click on 'Incursion FC' or 'Incursion Overview' for an example overview.
Setting Up an Overview
To start building an overview enter the following text in to a chat box and press enter.
/open_overview_settings
This will open your overview settings window in station so you can start working on it while docked.

Start by naming each tab you would like to have, we recommend having a Sansha Tab, Fleet, Logi, Contest, Beacons, Warp-Out, General.
Tab HTML
You can use the following attributes to affect the text, note that html only basic html colors work.
<b> </b> - makes the tab text bold.
<Color=Red> </Color> - Changes the color of the tab text.
<u> </u> - Underlines the tab text.
Setting Up Tabs
Sansha + Neuts tabs
Now you need to un-dock - Do it in a cheap ship and sit in a safe. Select your first tab your sansha tab.
On the overview settings window, click tab presets and click type. At the bottom click the Deselect All button. Manually add the “Mission NPC” and “Pirate NPC.” Also select all all of the player ships.
On the states tab click the “Show by default” option for all states except for “Pilot is in your fleet” option and it should be set to “Filter Out” - This will cause your Sansha tab to show, Sansha rats + neutral ships.
Fleet and Logi tabs
The fleet tab under types and states should have:
- All Pilot Ships
- Filter out all states but pilot is in your fleet. This should be set to “always show.”
The Logi tab under types and states should have:
- Logistics cruisers/Frigates
- Filter out all states but pilot is in your fleet. This should be set to “always show.”
Other
Warp Out
- Sun, Planets, Stations (states)
Beacons
- Beacons (states)
Contest
- Mission NPC, Pirate NPC (states)
- Leave pilot ships un-selected.
General
- This should be left as the default CCP overview.
Save each tab as something that is meaningful
This is the basis of your overview. If you wish to make your overview more advanced read the ship brackets section.
Setting up Ship Brackets
As stated above the ship brackets are the icons that float in space on certain objects. To set up ship brackets open your overview settings. Deselect all items and add the following:
- All Player Ships
- Sun
- Stargates
- Stations
- Planets
- Sansha (“Pirate NPC” and “Mission NPC”)
Save this as a new overview tab.
Right click on each of the tabs and click “Load Preset to Brackets” and then the name of your new tab. Now right click on “Load Preset to Tab” and select each overview tab setting for each specific tab. Repeat this process and customize it as desired you can have as many bracket presets as you wish.
This completes your overview.