User Tools
guides:anchoring
Table of Contents
Anchoring and Fleet Positioning (AAA/VVV Roles)
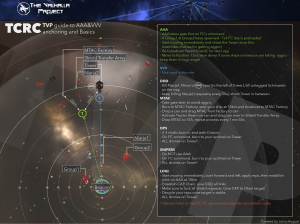
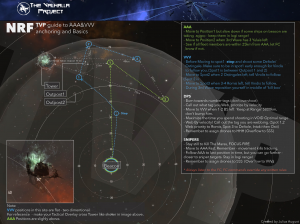
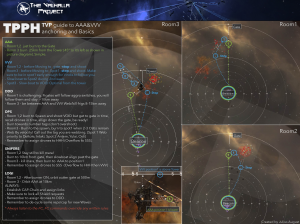
Please click on the pictures to view them full size!
General Tips
In all cases please ensure that you are getting to your position on time. If you find that new waves are spawning before you are getting to your position, it may be that your skills are lower than we are assuming, or that the fleet is operating extra fast. Adjust your future burns so that you are there on time (burn earlier).
True Creations Research Centre (TCRC)
NOTE: VVV has no role in this site!

AAA (Meatshield and Logi Anchor)
Meatshielding:
- In a TCRC, the AAA functions as a meatshield.
- They enter the site early to pull agro, and then logi can immediately begin repping them on landing
- For this reason, the AAA should ideally have Pithum A/B type invuls, C-Types are acceptable. T2 invuls should be avoided if possible.
Step-by-Step Instructions:
- Wait for the FC to call “AAA take the gate”
- Take the gate
- As soon as the grid loads on your overview call “Normal”, “Partial Preload” or “Full Preload”
- Normal = No Deltoles
- Partial Preload = Deltoles, but no Outunis
- Full Preload = Outunis on grid
If Normal/Partial Preload:
- Burn 3-4 cycles towards the MTAC factory
- Burn towards your anchor position, ensuring that you are in range of the fleet at the tower
If Full Preload:
- Overheat your hardeners
- Burn towards the MTAC factory (MWD on and leave it on)
- Lock and shoot an Outuni
- When Outunis are close to death, stop shooting
- Burn towards your anchor position, ensuring that you are in range of the fleet at the tower
It is very important to shoot an Outuni immediately to pull all the agro to you and allow logi to then land and put all reps on without worrying about who's taking agro
AAA (Logi/Sniper Anchor)
On Landing
- Burn immediately on landing to your first anchor position (do not wait for the Mara to die!)
- This is so as to pull logi into the centre of the site for repping Vindis who burn to the spawn
- It also ensures that logi are in position for when the second wave spawns
Second/Third Wave
- Remain in your first anchor position for the Uitra, Romi, Osti and Vylade, Romi waves
Final Wave
- When there are 2-3 Sniper targets left on the Vylade/Romi wave, burn to final anchor
- If any fleet members are more than 30km from you, inform the FC
VVV (Vindi Anchor):
On Landing
- Burn immediately to the rats and get your web on something, call the number over comms
- Move to the first anchor position early to ensure Vindis all anchor up before 2nd wave spawns
Third Wave
- Move to your second anchor position when there are 2-3 Ostis left
Final Wave
- Move to your third and final anchor position when there are 4 Romis left
- Reposition yourself when the wave spawns so that you are right in the centre of the rat spawn
AAA (Logi/Sniper Anchor)
First and Second Room
- Just burn to the out gate
Third Room
- Burn immediately on landing to your anchor position and remain there until the tower bash starts, at which point you can reposition yourself closer to the tower if necessary.
VVV (Vindi Anchor):
First and Second Room
- Burn out to the spawn and towards the out gate in a nice wide arc as shown in the picture
Third Room First-Second Wave
- Burn out to the spawn and to your first anchor position in a nice wide arc
Third Room Final Wave
- Move slightly towards the beacon to place the Vindis in optimal range of the final spawn
- Move within optimal range of the tower once the final wave is reaching its conclusion
guides/anchoring.txt · Last modified: 2017/01/07 19:06 by Aygo Swagtomo


